PD Tracker: Sign-In Process
PD Tracker Sign-In Process
The PD sessions are listed in the PD tracker under available events until you are enrolled. Once you are enrolled, they will show up under your My Activities tab. You are required to be enrolled in a session PRIOR to the day. Think about it as registering for a course prior to taking a course where there is no same-day registration. Then on the day and at the time of the workshop session/course you are required to sign-in. Instead of signing in on a paper sign-in sheet you will be signing-in virtually through the Teachpoint PD Tracker. This must be done during the time of your session. More specific details about this process are listed below.
The PD sessions are listed in the PD tracker under available events until you are enrolled. Once you are enrolled, they will show up under your My Activities tab. You are required to be enrolled in a session PRIOR to the day. Think about it as registering for a course prior to taking a course where there is no same-day registration. Then on the day and at the time of the workshop session/course you are required to sign-in. Instead of signing in on a paper sign-in sheet you will be signing-in virtually through the Teachpoint PD Tracker. This must be done during the time of your session. More specific details about this process are listed below.
Viewing Sessions and Enrolling in Sessions
- To view the sessions, log into Teachpoint and click on the graduation cap on the left to access the PD Tracker.
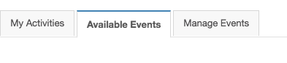
- To access sessions you have been enrolled in, you should find them under the My Activities Tab
- To access all of the sessions for the day, you will find them under the Available Events Tab
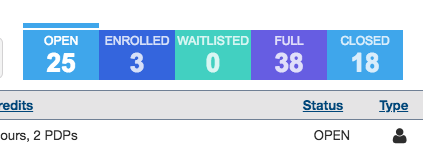
- Please enroll in the session you will be attending. Under Available Events you can look at any of them listed as a status of Open (or use the Open filter at the top). In some cases, you may have already been enrolled in the session by Central Office, so it will fall under your My Activities tab.
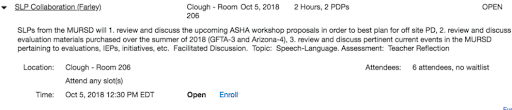
- To read more of the description of the session (click on the title) and details for the event will open up. There is a sample below of one of the sessions after clicking on the title. It outlines the location, time it begins.
- To enroll into an open session, click on the blue link that says Enroll. Then it will be added to your My Activities tab.
TABS
|
|
Signing-In and Confirming Attendance in Sessions (for PDPs)
- Once enrolled, on the date and time of your session you have the ability to electronically sign into the session. We will be approving PDPs in Teachpoint automatically when you have signed into the session.
- You can sign into the session as follows:
- In the session description there will be a blue link that says Confirm. You can click on that to confirm that you are present. That will change your status from enrolled to attending.
- You may also see a green button available on the My Activities homepage that says Sign in NOW.

|
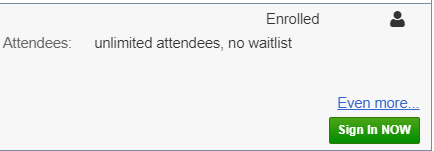
|
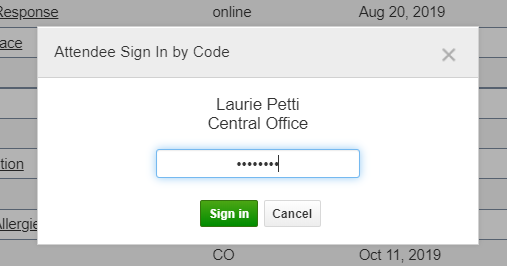
- Then once you click on the sign-in it will ask you to sign-in by Code. The code will always be the date of the PD day. For example: 3/12/21
An alternative process for signing in managed by the presenter:
The presenter listed for the session can create an ESignin sheet and everyone in attendance can sign-in.
The presenter listed for the session can create an ESignin sheet and everyone in attendance can sign-in.
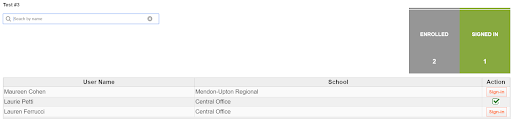
- Under the Managed Events Tab, the presenter clicks on the blue link that shows the number of people enrolled under the Enrolled/Waiting/Need Approval column.
- Once the session is selected, the presenter then clicks on eSigninIN in the upper
- Under the Managed Events Tab, the presenter clicks on the blue link that shows the number of people enrolled under the Enrolled/Waiting/Need Approval column.
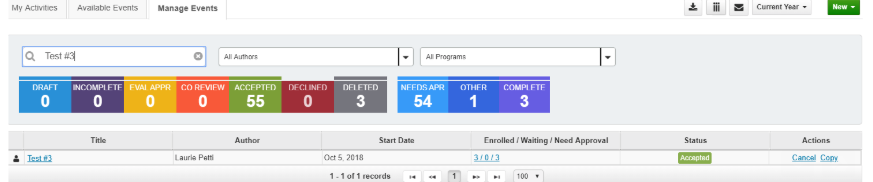
Once the session is selected, the presenter then clicks on eSigninIN in the upper right hand corner and chooses Electric Sign In Sheet, which will bring up a box that looks like the following. Then you choose the time slot by clicking the circle.
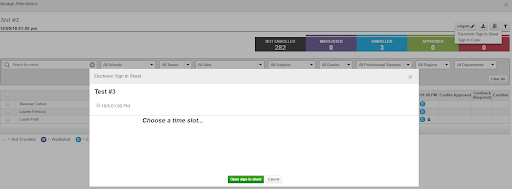
Once the presenter clicks on the date/time, it brings up a screen with the following choices:
1.Attendee’s password required
2.Allow sign-in using master password
3.Auto-Approve Credits on sign-in
The presenter should then select #1 (Attendee’s password required, which will be the Teachpoint password) and #3 (Auto-Approve Credits on Sign-In.)
1.Attendee’s password required
2.Allow sign-in using master password
3.Auto-Approve Credits on sign-in
The presenter should then select #1 (Attendee’s password required, which will be the Teachpoint password) and #3 (Auto-Approve Credits on Sign-In.)
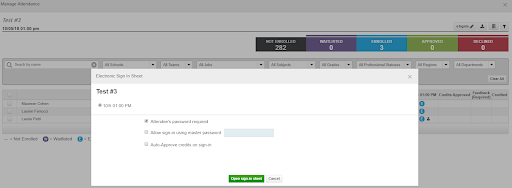
The presenter selects the green button to open sign-in sheet, which brings them to a screen where members can sign-in